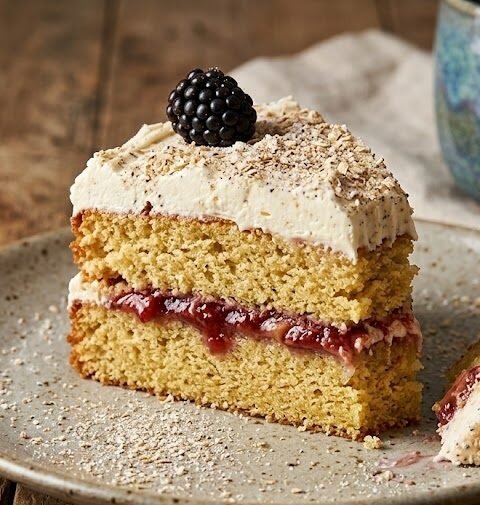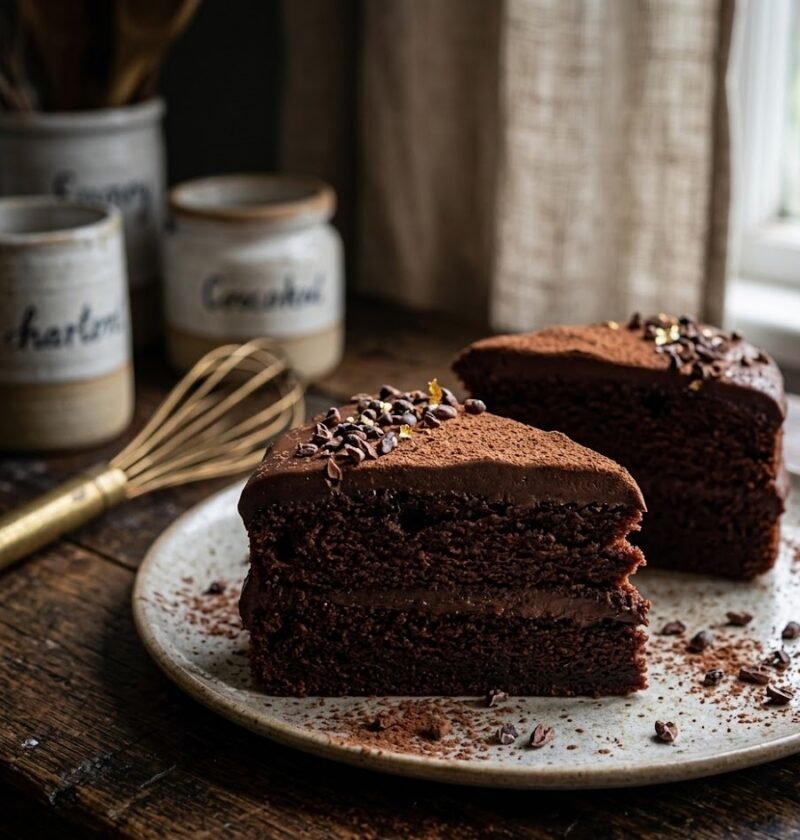
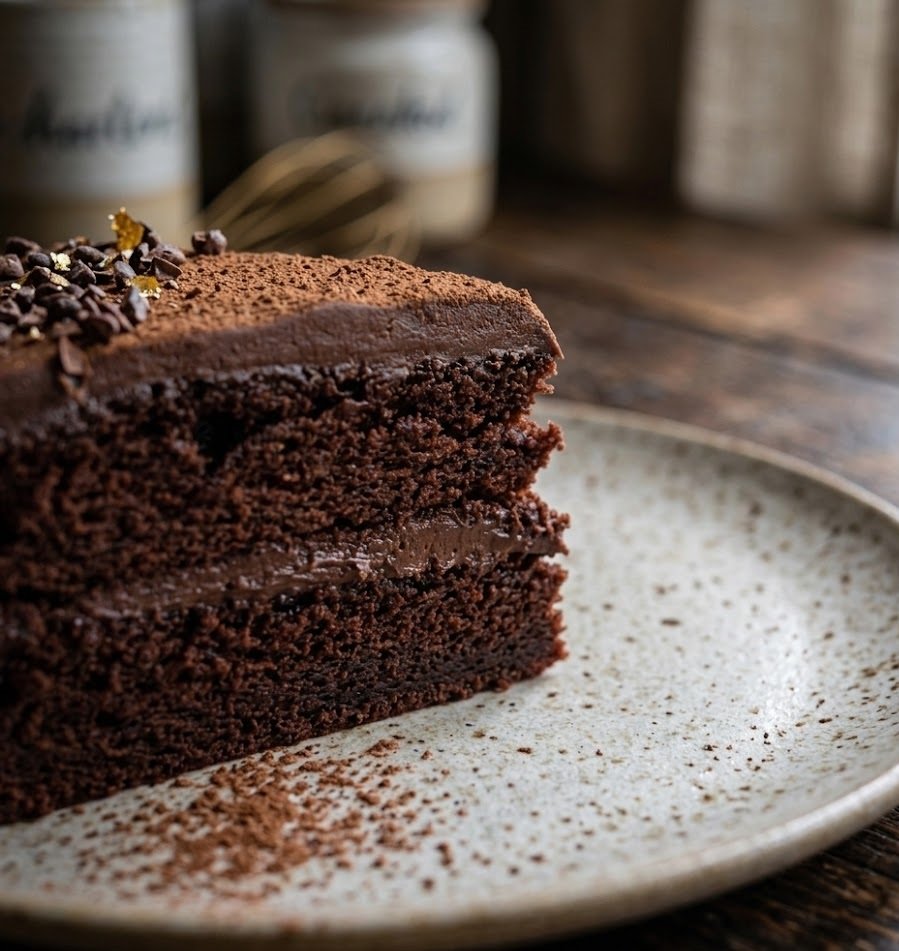
This Mary Berry chocolate Victoria sponge is a beautifully rich twist on the classic British teatime favourite. Two layers of light, cocoa-laced sponge are sandwiched together with whipped chocolate cream and a generous spread of chocolate buttercream, creating a cake that is indulgent yet wonderfully simple to make. The texture is soft, moist, and tender with a deep chocolate flavour that satisfies without being too heavy. Suitable for bakers of all levels, this recipe takes just over an hour from start to finish and delivers a showstopper result every single time.
What Is Mary Berry’s Chocolate Victoria Sponge?
Mary Berry’s chocolate Victoria sponge takes the beloved all-in-one Victoria sponge method and adds high-quality cocoa powder to create a rich, chocolatey version of the British classic. The genius of this recipe lies in its simplicity. Rather than fussing with complicated techniques, Mary Berry’s approach combines all the sponge ingredients in a single bowl and beats them together until smooth. The result is a beautifully risen, evenly baked chocolate sponge with an incredibly soft crumb.
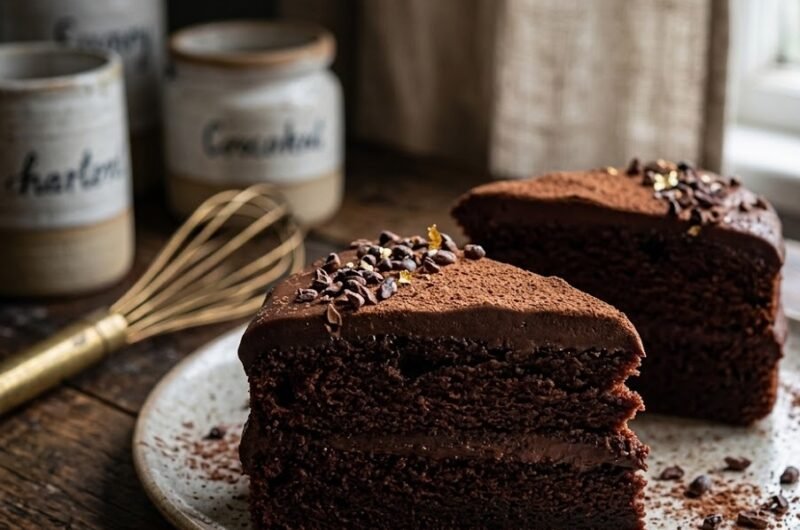
The filling is where this cake truly shines. A silky chocolate buttercream spread across one layer provides sweetness and depth, while lightly whipped cream adds a cool, luxurious contrast. Finished with a generous dusting of cocoa powder or icing sugar on top, this chocolate Victoria sponge looks every bit as impressive as it tastes. It is the kind of cake that earns compliments at every gathering, yet requires no specialist skills or equipment to pull together.
Ingredients
For the Chocolate Sponge
- 225g unsalted butter, softened
- 225g caster sugar
- 4 large eggs
- 190g self-raising flour
- 35g cocoa powder
- 1 tsp baking powder
- 2 tbsp milk
- Butter, for greasing tins
- Baking parchment
For the Chocolate Buttercream Filling
- 100g unsalted butter, softened
- 200g icing sugar, sifted
- 25g cocoa powder, sifted
- 1 tbsp milk
For the Whipped Cream Layer
- 150ml double cream
- 1 tbsp icing sugar
For the Topping
- Icing sugar or cocoa powder, for dusting
- Chocolate shavings or curls (optional)
How to Make Mary Berry Chocolate Victoria Sponge
- Prepare the oven and tins: Preheat the oven to 180°C (160°C fan). Grease two 20cm (8-inch) round sandwich tins with butter, then line the bases with baking parchment. This ensures the sponges release cleanly and bake evenly throughout.
- Sift the dry ingredients: Sift the self-raising flour, cocoa powder, and baking powder together into a large mixing bowl. Sifting removes lumps from the cocoa and introduces air, which helps the sponge rise beautifully. Add the softened butter, caster sugar, eggs, and milk to the same bowl.
- Beat the batter: Using an electric hand mixer or stand mixer, beat everything together for about 2 minutes until the batter is smooth, pale in colour, and well combined. Scrape down the sides of the bowl halfway through to make sure no pockets of flour or cocoa remain. The mixture should drop easily off a spoon.
- Fill the tins: Divide the batter equally between the two prepared tins. Use a spatula or the back of a spoon to level the tops gently. Even distribution means both sponges will bake at the same rate and rise to the same height, giving you a beautifully balanced finished cake.
- Bake the sponges: Place both tins on the middle shelf of the oven and bake for 22 to 25 minutes. The sponges are done when they are well risen, springy to the touch, and beginning to shrink slightly away from the edges of the tin. Avoid opening the oven door during the first 20 minutes, as this can cause the sponges to sink.
- Cool the sponges: Leave the sponges in their tins for 5 minutes after removing from the oven. Then turn them out onto a wire rack, peel off the baking parchment, and allow them to cool completely. It is essential that the sponges are fully cooled before filling, otherwise the buttercream and cream will melt and slide.
- Make the chocolate buttercream: In a clean bowl, beat the softened butter until pale and creamy. Gradually add the sifted icing sugar and cocoa powder, beating well after each addition. Add the milk and continue to beat until the buttercream is light, fluffy, and spreadable. If it seems too stiff, add another splash of milk.
- Whip the cream: In a separate chilled bowl, whip the double cream and icing sugar together until soft peaks form. Be careful not to over-whip, as the cream can quickly become grainy. Soft peaks hold their shape gently and create a luxurious, smooth layer when spread.
- Assemble the cake: Place one sponge layer bottom-side up on a serving plate or cake stand. Spread the chocolate buttercream evenly across the top. Spoon the whipped cream over the buttercream and spread gently. Place the second sponge on top, top-side up, pressing down very lightly so it sits level.
- Finish and serve: Dust the top generously with icing sugar, cocoa powder, or a combination of both. Scatter chocolate shavings or curls over the top if you like for an extra special presentation. Slice with a sharp knife and serve at room temperature for the best flavour and texture.
Tips for the Perfect Chocolate Victoria Sponge
Why did my chocolate sponge sink in the middle?
A sunken sponge is usually caused by opening the oven door too early or removing the cake before it is fully baked. The structure of the sponge needs time to set, so resist the temptation to peek during the first 20 minutes. Also check that your baking powder is within its use-by date, as expired leavening agents lose their effectiveness and can result in flat, dense cakes.
How do I keep the sponge moist and not dry?
The key to a moist chocolate sponge is using properly softened butter, not over-baking, and adding milk to the batter. Cocoa powder absorbs more liquid than plain flour, so the milk compensates for this and keeps the crumb tender. Pull the sponges from the oven as soon as they spring back when lightly pressed in the centre.
Can I use Dutch-process cocoa powder instead of regular cocoa?
Yes, Dutch-process cocoa works well in this recipe and produces a slightly darker sponge with a smoother, less acidic chocolate flavour. Since this recipe uses self-raising flour and baking powder for leavening rather than bicarbonate of soda, the type of cocoa you choose will not affect the rise. Use whichever you prefer or have on hand.
What is the best way to get even sponge layers?
Weigh the batter as you divide it between the two tins. Place each tin on a kitchen scale and spoon the batter in until the weights are equal. This simple step ensures both layers bake evenly and rise to the same height, making assembly much easier and giving you a professional-looking finished cake.
Should I use salted or unsalted butter?
Unsalted butter is best for both the sponge and the buttercream because it gives you full control over the salt level. A tiny pinch of salt can be added to the dry ingredients if you like, as it enhances the chocolate flavour beautifully. Salted butter can make the buttercream taste slightly too salty, especially since icing sugar is already quite sweet.
Serving Suggestions
- Serve generous slices alongside a cup of strong English tea or freshly brewed coffee for a classic afternoon tea pairing.
- Add a scoop of vanilla ice cream or a drizzle of warm chocolate sauce on the side to turn it into a simple dessert.
- Pair with fresh raspberries or strawberries for a fruity contrast that cuts through the richness of the chocolate.
- Present on a cake stand with a light dusting of cocoa powder for birthday celebrations, Sunday lunches, or garden parties.
- Serve as part of a baking spread alongside scones, biscuits, and finger sandwiches for a full afternoon tea experience.
Storage
Room Temperature
If filled with buttercream only (no fresh cream), this chocolate Victoria sponge keeps well at room temperature in an airtight cake tin or container for up to 2 days. Place it in a cool, dry spot away from direct sunlight. If your kitchen runs warm, refrigeration is the safer option to prevent the buttercream from softening too much.
Refrigerator
Because this recipe includes a whipped cream layer, it should be stored in the refrigerator if not being served immediately. Cover loosely with cling film or place in a large airtight container to prevent the sponge from absorbing fridge odours. It keeps well in the fridge for up to 3 days. Remove from the fridge about 30 minutes before serving so the sponge returns to room temperature and the buttercream softens.
Freezing
The unfilled sponge layers freeze beautifully for up to 3 months. Wrap each cooled layer tightly in cling film and then again in a layer of aluminium foil. To use, thaw at room temperature for 2 to 3 hours, then fill and assemble as directed. Do not freeze the cake once it has been filled with whipped cream, as the cream will become watery upon thawing.
Nutrition Information
The following values are approximate and based on one slice when the cake is cut into 12 servings.
- Calories: 450 kcal
- Carbohydrates: 48g
- Protein: 5g
- Fat: 27g
- Saturated Fat: 16g
- Sodium: 180mg
Nutritional values are estimates only and may vary depending on specific ingredients, brands, and portion sizes used.
Frequently Asked Questions
Can I make this chocolate Victoria sponge in one tin instead of two?
Yes, you can bake the batter in a single deep 20cm round tin. Increase the baking time to approximately 40 to 45 minutes and check with a skewer inserted into the centre. Once cooled, slice the cake horizontally through the middle to create two layers for filling.
Can I use dark chocolate instead of cocoa powder in the sponge?
Cocoa powder is recommended for the sponge because it provides a consistent, even chocolate flavour throughout without adding extra fat or moisture that could affect the rise. However, you can use melted and cooled dark chocolate in the buttercream for a richer, more intense filling.
How do I know when the sponge is fully baked?
The sponge is ready when it is well risen, golden brown on top, and springs back when lightly pressed in the centre. It should also be starting to pull away slightly from the edges of the tin. A skewer inserted into the middle should come out clean with no wet batter clinging to it.
Can I make this cake ahead of time for a party?
Absolutely. Bake the sponge layers a day in advance and store them wrapped in cling film at room temperature. You can also make the buttercream the day before and keep it covered in the fridge. Assemble the cake on the day of serving for the freshest result, especially since the whipped cream layer is best enjoyed the same day it is added.
What can I use instead of double cream in the filling?
If you prefer not to use double cream, you can fill the cake with chocolate buttercream only for a simpler version. Alternatively, use mascarpone mixed with a tablespoon of icing sugar for a thick, stable cream layer that holds up well at room temperature.
This Mary Berry chocolate Victoria sponge recipe proves that a truly impressive chocolate cake does not need to be complicated. With a straightforward all-in-one method, everyday ingredients, and a filling that balances rich chocolate buttercream with cool whipped cream, this is the kind of cake you will bake again and again. Whether you are preparing it for a weekend treat, a birthday celebration, or simply because you fancy something chocolatey and wonderful, this recipe delivers soft, moist, and deeply satisfying results every time. Once you have tried it, it will become your go-to chocolate cake for every occasion.
Mary Berry Chocolate Victoria Sponge Recipe
Course: DessertCuisine: BritishDifficulty: Easy4
servings30
minutes40
minutes300
kcal1
hour10
minutesA rich, indulgent chocolate twist on the classic Victoria sponge by Mary Berry. Two light cocoa sponge layers filled with silky chocolate buttercream and freshly whipped cream, finished with a dusting of icing sugar. Simple, elegant, and perfect for any occasion.
Ingredients
225g unsalted butter, softened
225g caster sugar
4 large eggs
190g self-raising flour
35g cocoa powder
1 tsp baking powder
2 tbsp milk
100g unsalted butter, softened (for buttercream)
200g icing sugar, sifted
25g cocoa powder, sifted (for buttercream)
1 tbsp milk (for buttercream)
150ml double cream
1 tbsp icing sugar (for cream)
Icing sugar or cocoa powder, for dusting
Baking parchment and butter for greasing
Directions
- Preheat the oven to 180°C (160°C fan). Grease two 20cm round sandwich tins with butter and line the bases with baking parchment.
- Sift the self-raising flour, cocoa powder, and baking powder into a large mixing bowl. Add the softened butter, caster sugar, eggs, and milk.
- Beat with an electric mixer for about 2 minutes until the batter is smooth, pale, and fully combined. Scrape down the sides halfway through.
- Divide the batter equally between the two prepared tins and level the tops with a spatula.
- Bake for 22 to 25 minutes until well risen, springy to the touch, and slightly shrinking from the edges. Do not open the oven during the first 20 minutes.
- Cool in the tins for 5 minutes, then turn out onto a wire rack, peel off the parchment, and leave to cool completely.
- For the buttercream, beat softened butter until pale. Gradually add sifted icing sugar and cocoa powder, beating well. Add milk and beat until light and fluffy.
- Whip the double cream with icing sugar until soft peaks form. Do not over-whip.
- Place one sponge bottom-side up on a serving plate. Spread with chocolate buttercream, then top with whipped cream. Place the second sponge on top.
- Dust the top with icing sugar or cocoa powder and add chocolate shavings if desired. Serve at room temperature.
Notes
- Ensure butter is fully softened to room temperature before mixing for the best rise and lightest crumb.
- Do not open the oven door during the first 20 minutes of baking to prevent the sponges from sinking.
- Unfilled sponge layers can be wrapped tightly and frozen for up to 3 months.
- For a richer filling, use melted dark chocolate folded into the buttercream.
“`