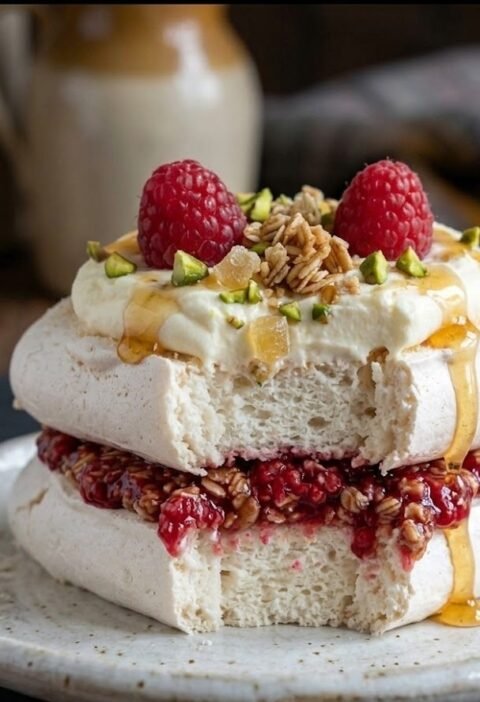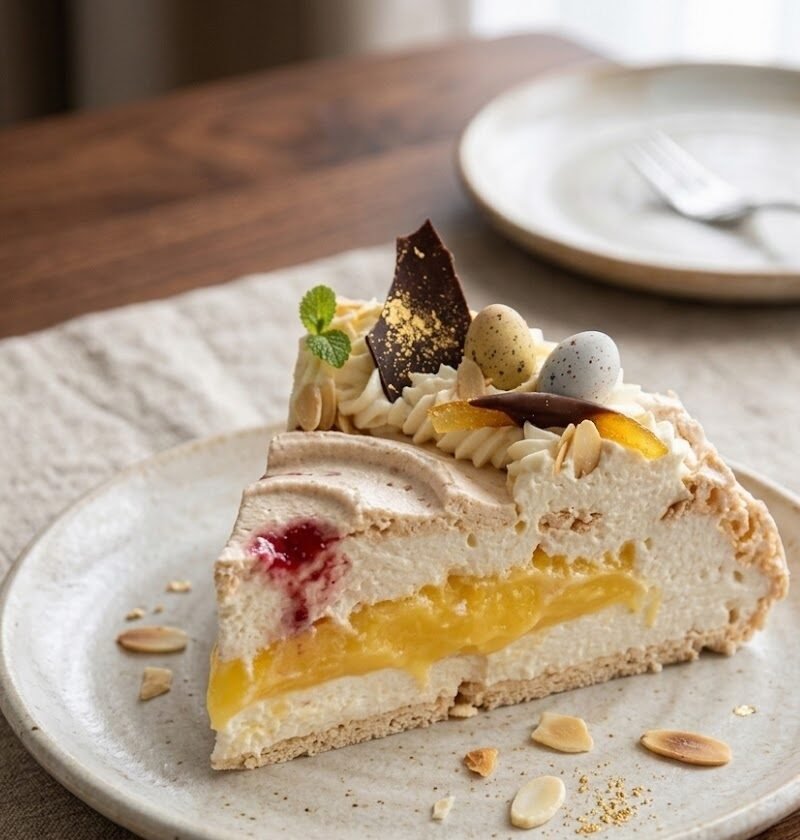
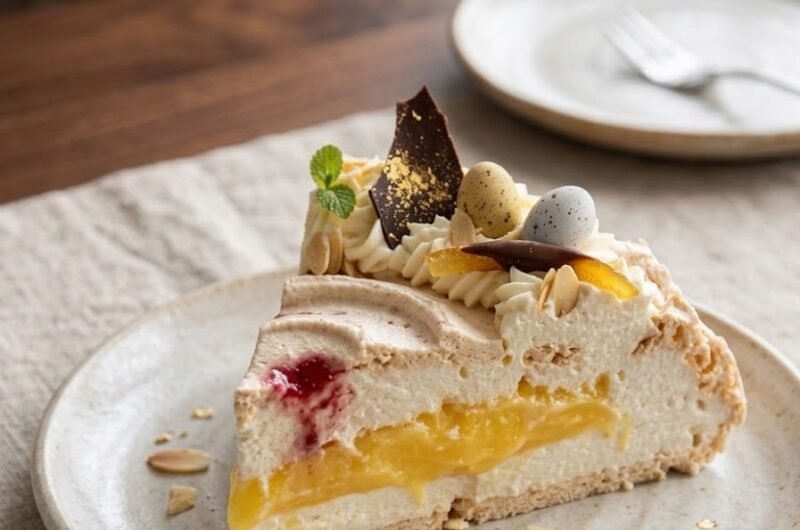
This Easter lemon pavlova is a crisp-on-the-outside, marshmallow-soft meringue nest piled high with lemon curd, clouds of lightly sweetened whipped cream, and a bright tumble of berries and mini eggs. It tastes fresh, creamy, and zingy, with that classic pavlova crunch giving way to a chewy centre. The technique is simple, but pavlova rewards a little patience, so I’d call it medium difficulty. Total time is around 3 to 4 hours including cooling, with most of that being hands-off.
What This Easter Lemon Pavlova Tastes Like
The meringue bakes up pale and delicate, with a crisp shell that shatters lightly under your spoon and a soft, marshmallow centre underneath. Lemon curd brings a sharp, buttery tang that cuts through the sweetness, while the whipped cream keeps everything smooth and creamy. Finished with berries and mini eggs, it’s bright, festive, and the kind of dessert that disappears fast even after a big Easter lunch.
Ingredients
For the pavlova nest
- 6 large egg whites, at room temperature
- 300g caster sugar
- 1 tsp cornflour
- 1 tsp white wine vinegar (or distilled white vinegar)
- Pinch of fine salt
For the lemon filling
- 320g lemon curd (about 1 jar)
- 400ml double cream, cold
- 2 tbsp icing sugar
- 1 tsp vanilla extract
For the Easter topping
- Finely grated zest of 1 to 2 unwaxed lemons (use to taste)
- 250g mixed berries (strawberries, raspberries, blueberries)
- 80 to 100g mini chocolate eggs
- Mint leaves (optional)
How to Make Mary Berry Easter Lemon Pavlova Recipe
Prepare the oven and tray
- Prepare the oven: Preheat the oven to 150°C or 130°C fan. Place a shelf in the middle of the oven so the pavlova bakes evenly and stays pale.
- Line your tray: Line a large baking tray with baking parchment. Draw a 20cm circle on the underside of the parchment (so the ink or pencil doesn’t touch the meringue), then flip it over.
- Get set up for success: Make sure your mixing bowl and whisk are squeaky clean and completely grease-free. Even a little yolk or oil can ruin the whip.
Whip the meringue
- Whisk the whites: Add the egg whites and a pinch of salt to a large bowl. Whisk until you have stiff peaks, meaning the whites stand up firmly when you lift the whisk.
- Add sugar gradually: With the mixer running, add the caster sugar 1 tablespoon at a time. Whisk well after each addition until the mixture is thick, glossy, and no longer feels gritty if you rub a little between your fingers.
- Finish the meringue: Sprinkle over the cornflour and drizzle in the vinegar. Whisk briefly, just 10 to 15 seconds, to combine.
Shape and bake
- Shape a nest: Spoon the meringue onto the circle and gently spread it out. Build the sides slightly higher than the middle and create a dip in the centre for the filling.
- Bake: Bake at 150°C (130°C fan) for 10 minutes, then reduce the oven to 120°C (100°C fan) and bake for a further 75 minutes. Keep the oven door closed so the pavlova doesn’t collapse.
- Switch off and rest: Turn the oven off and leave the pavlova inside to cool slowly for at least 2 hours (overnight is even better). Keep the door closed while it cools.
Cool and prep the filling
- Cool completely: Once fully cool, remove the pavlova from the oven. Expect a few cracks. That’s normal and gives the pavlova its character.
- Whip the cream: In a chilled bowl, whip the double cream with the icing sugar and vanilla to soft peaks. Stop while it’s still spoonable and plush.
Assemble and decorate
- Move to a serving plate: Carefully lift the pavlova onto your serving plate or stand. It’s delicate, so support it with two spatulas if you can.
- Add lemon curd: Spoon lemon curd into the centre first. This keeps the curd tucked inside the “nest” and helps stop it sliding.
- Top with cream and fruit: Pile on the whipped cream, then scatter over the berries. Finish with lemon zest, mini eggs, and a few mint leaves if you like.
- Serve right away: Pavlova is at its best soon after assembling, while the shell is still crisp.

Tips for Perfect Pavlova
Why did my pavlova crack?
Cracks are very common and usually harmless. They happen as the meringue expands in the oven and then contracts while cooling. Cooling the pavlova slowly in the switched-off oven helps, but even a cracked pavlova looks beautiful once it’s filled.
How do I stop pavlova from weeping or going sticky?
Weeping is often caused by undissolved sugar or humidity. Add the sugar very gradually and whisk until the mixture feels smooth, not gritty. Also, avoid assembling too early since the curd and cream will soften the shell over time.
How do I get that marshmallow centre without a raw middle?
Low and slow is key. The initial hotter blast sets the outside, then the lower temperature dries the shell while keeping the centre soft. If your pavlova feels wet inside, it likely needed longer at the lower temperature or more cooling time in the oven.
Can I make individual pavlova nests instead of one large one?
Yes, and they’re lovely for Easter. Pipe or spoon 8 to 10 small nests and start checking them around 45 to 55 minutes at 120°C (100°C fan), depending on size.
Serving Suggestions
- Serve with extra lemon curd on the side for those who like it sharp.
- Add a spoonful of crushed raspberries for a pretty, tangy sauce.
- Pair with coffee after lunch, or a chilled glass of prosecco for a festive finish.
Storage
Room temperature
Store the plain, unfilled pavlova in an airtight container at room temperature for up to 2 days. Keep it somewhere cool and dry, away from steam and humidity.
Refrigerator
Once filled, pavlova is best eaten the same day. If you have leftovers, refrigerate for up to 24 hours. The meringue will soften, but it will still taste wonderful.
Freezing
You can freeze the unfilled meringue base. Wrap it carefully, place in a rigid container, and freeze for up to 1 month. Defrost at room temperature, still wrapped, then unwrap and crisp it in a very low oven (about 100°C fan) for 10 to 15 minutes if needed. Do not freeze once filled with cream and lemon curd.
Nutrition
- Calories: 390 kcal
- Carbohydrates: 54 g
- Protein: 4 g
- Fat: 18 g
- Saturated Fat: 11 g
- Sodium: 95 mg
Disclaimer: Nutrition values are estimates and will vary depending on the exact ingredients and brands you use.
FAQs
Can I make pavlova the day before Easter?
Yes. Make the meringue base the day before and store it airtight at room temperature. Whip the cream and assemble with lemon curd, fruit, and mini eggs shortly before serving for the crispest shell.
Why is my pavlova soft and chewy instead of crisp?
A slightly chewy centre is normal, but if the whole pavlova is soft it usually means it did not dry out enough or it absorbed moisture. Bake low and slow, cool it in the switched-off oven, and store the unfilled base in an airtight container away from humidity.
Can I use carton egg whites for pavlova?
Fresh egg whites are the most reliable for volume and stability. Some carton egg whites work well, but results vary by brand. If using carton whites, choose a brand intended for whipping and avoid any labelled as heat-treated for safety, as they can whip poorly.
Can I use homemade lemon curd instead of a jar?
Absolutely. Homemade lemon curd tastes brighter and more buttery. Let it cool completely before using so it does not melt the cream, and add it just before serving to keep the pavlova crisp.
How do I stop egg yolk getting into the whites?
Separate eggs while they are cold (the yolks are firmer), one at a time into a small bowl, then tip each white into your mixing bowl. That way if one yolk breaks, you only lose one egg, not the whole batch.
Mary Berry Easter Lemon Pavlova Recipe
Course: DessertCuisine: BritishDifficulty: Medium10
servings25
minutes1
hour25
minutes220
minutes390
kcal1
hour50
minutesA crisp, marshmallow-centred pavlova nest topped with lemon curd, softly whipped cream, fresh berries, and mini eggs. A bright, showstopping British dessert for Easter.
Ingredients
- For the pavlova
6 large egg whites, at room temperature
300g caster sugar
1 tsp cornflour
1 tsp white wine vinegar (or distilled white vinegar)
Pinch of fine salt
- For the filling
320g lemon curd (about 1 jar)
400ml double cream, cold
2 tbsp icing sugar
1 tsp vanilla extract
- For the Easter topping
2 unwaxed lemons, zest finely grated (use to taste)
250g mixed berries (strawberries, raspberries, blueberries)
80–100g mini chocolate eggs
Small handful mint leaves (optional)
Directions
- Preheat the oven to 150°C (130°C fan). Line a baking tray with baking parchment and draw a 20cm circle on the underside as a guide.
- Whisk the egg whites with a pinch of salt to stiff peaks. Add the caster sugar 1 tablespoon at a time, whisking well after each addition until the meringue is thick and glossy.
- Sprinkle over the cornflour and vinegar and whisk briefly just to combine.
- Dollop the meringue onto the circle and shape into a nest with higher sides and a dip in the centre.
- Bake for 10 minutes, then reduce the oven to 120°C (100°C fan) and bake for 75 minutes. Turn the oven off and leave the pavlova inside to cool for at least 2 hours (or overnight) with the door closed.
- Whip the double cream with icing sugar and vanilla to soft peaks. Keep it plush and spoonable.
- To assemble, lift the cooled pavlova onto a serving plate. Spoon in lemon curd, then top with whipped cream. Finish with lemon zest, berries, mini eggs, and mint if using.
Notes
- Use clean, grease-free bowls and beaters for the meringue. Any trace of fat can stop the whites whipping properly.
- Add the sugar slowly so it dissolves, giving you a glossy pavlova with a crisp shell.
- Assemble just before serving for the crispest texture.
- Cooling the pavlova in the switched-off oven helps reduce cracking and collapse.